Learning how to create Amazon listings? Let’s explore this guide which will serve as a step-by-step instruction manual for creating your first listing on Amazon
Amazon is the leading eCommerce platform. In 2021 alone, the platform made over $450 billions in retail sales. Millions of sellers were able to successfully grow on the platform through its seller’s program and Amazon’s FBA listing & customer service feature. However, starting on the platform can be overwhelming. The details involved in Amazon lists creation process can confuse a lot of newcomers.
Learning how to create Amazon listings can be intimidating. But don’t worry! The purpose of this article is to serve as a step-by-step instruction manual for creating your first listing on Amazon. This guide will cover all the essentials you need to create an Amazon listing.
You should be able to take the steps outlined in this article and apply them to make your own Amazon product listing by the time you finish reading.
So let’s get started.
How to create an Amazon listing for new products
Learning how to add products on Amazon is the first step in your eCommerce journey. The average conversion rate of Amazon listings is between 10-15% and even higher for prime members. This means Amazon product listings have a significant impact on your sales.
Therefore, learning how to list items on Amazon properly can help you grow your business faster.
This guide will not only teach you how to create listings on Amazon but also how to convert them into sales. All you’ve to do is follow the steps laid out to create a listing on Amazing.
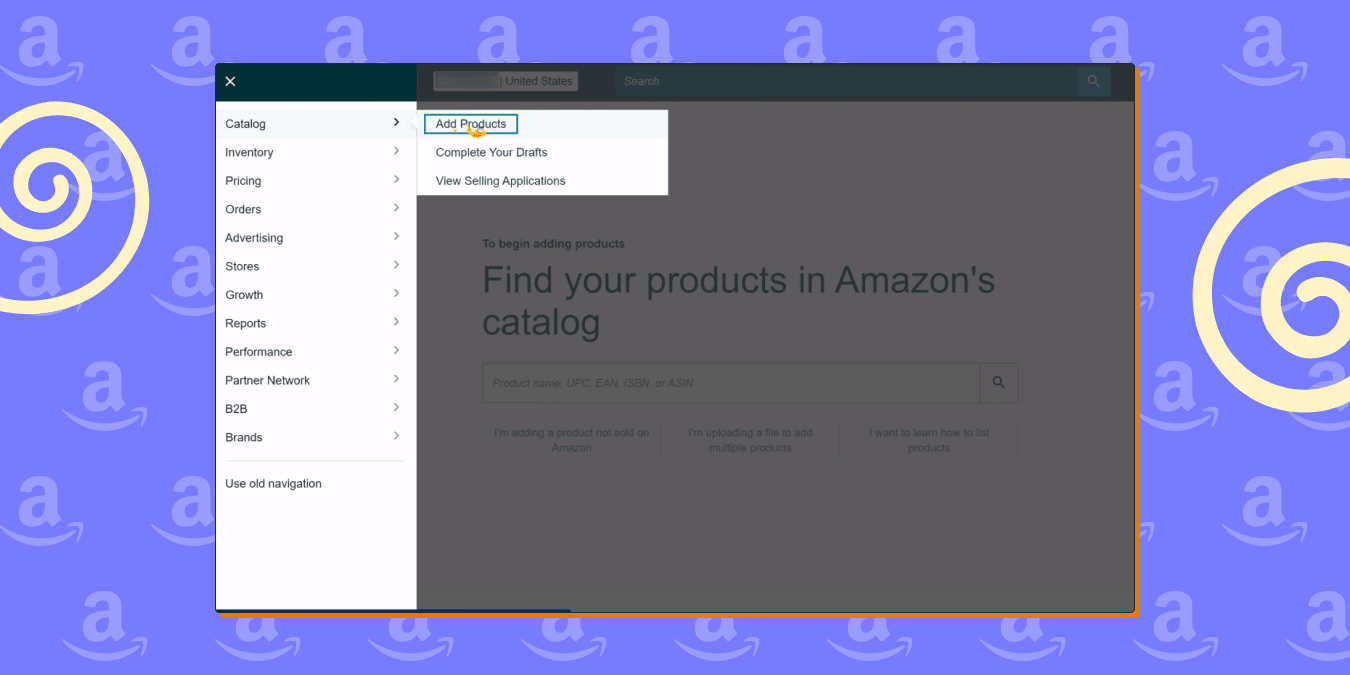
Step 1: Log in to your Amazon seller central. Open the drop menu on the left and hover your mouse over the catalog. Then click on “Add Products”.
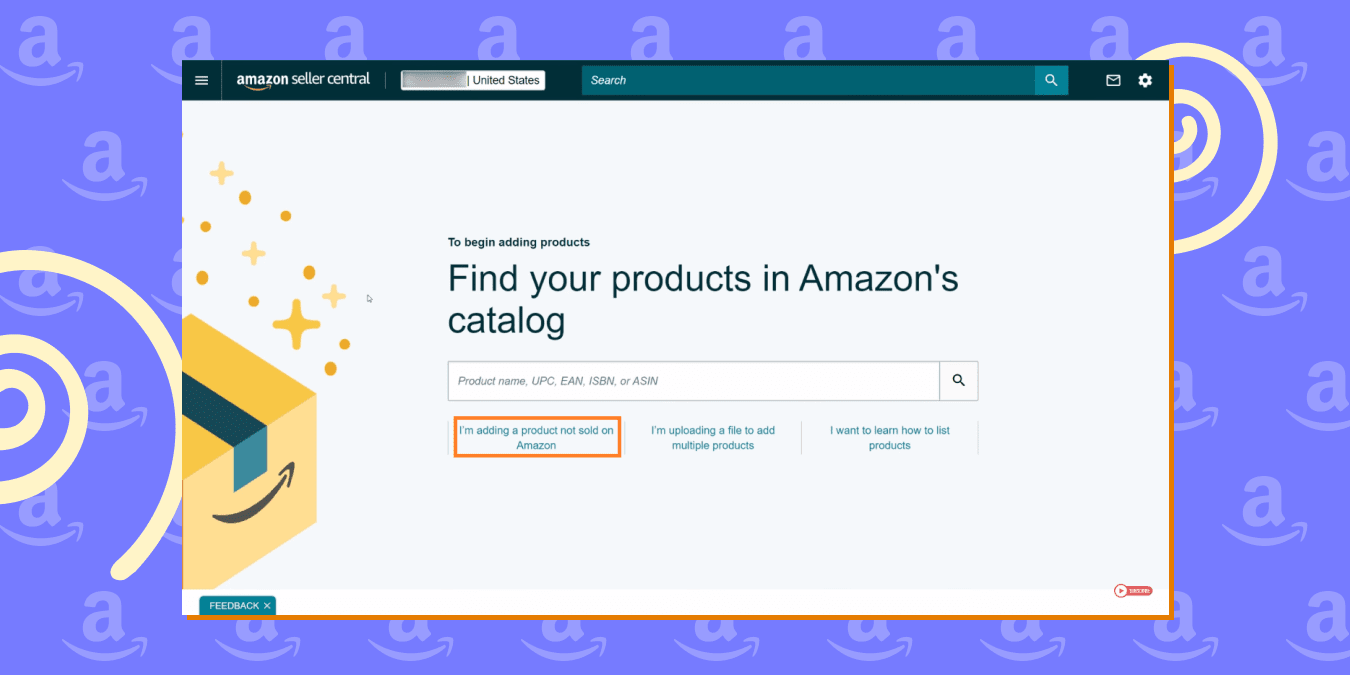
Step 2: After the “Add Products” loads up, you’ll have three options to choose from.
- The first option is to add a product that is already listed on Amazon. You can do so by searching for the product using its name or ID.
- The second option is to create a new product listing on Amazon. Simply, click on “I’m adding a product not sold on Amazon”.
The third & last option is bulk upload, which is used to add several products at once. This method of Amazon product listing is ideal if your business model is Amazon dropshipping or Amazon retail arbitrage, which requires uploading multiple products. However, this method of adding products on Amazon can be difficult and time-consuming. A better alternative is integrating an inventory management tool such as Sellbery.
Exploring the best online learning platforms to understand these tools can enhance your expertise and streamline your workflow for better results.
Since we are learning how to create an amazon listing for new products we will choose the second option.
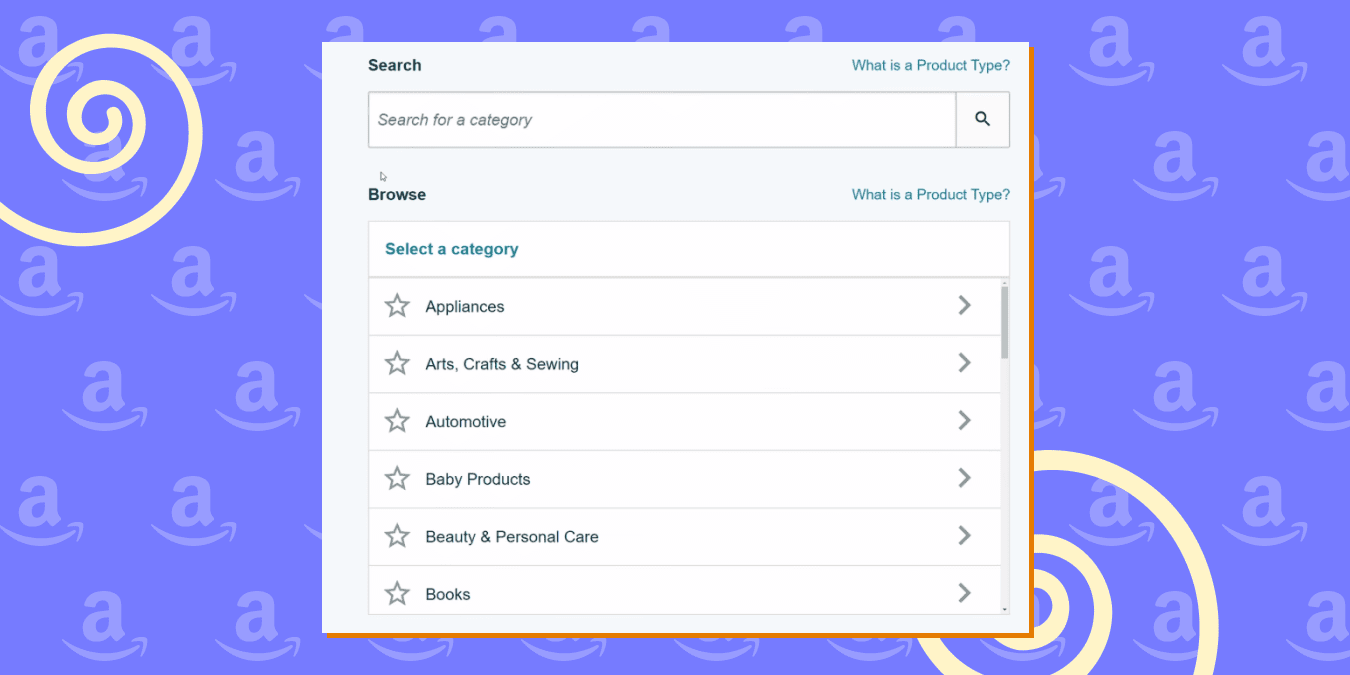
Step 3: Next you’ve to choose a category for your product. You can categorize your product listing on Amazon in two ways.
- Search Method: The first method is to search for related categories. Simply type the keyword that best describes your product and then select the recommended category.
- The manual method: The second method is a more detailed one. First you choose the parent category from the given list of categories and then find subcategories for your product. Once you’re all the way down to your child category click “Select”.
If you don’t know which category suits your product. You can perform product research on Amazon to figure out how products are categorized on Amazon.
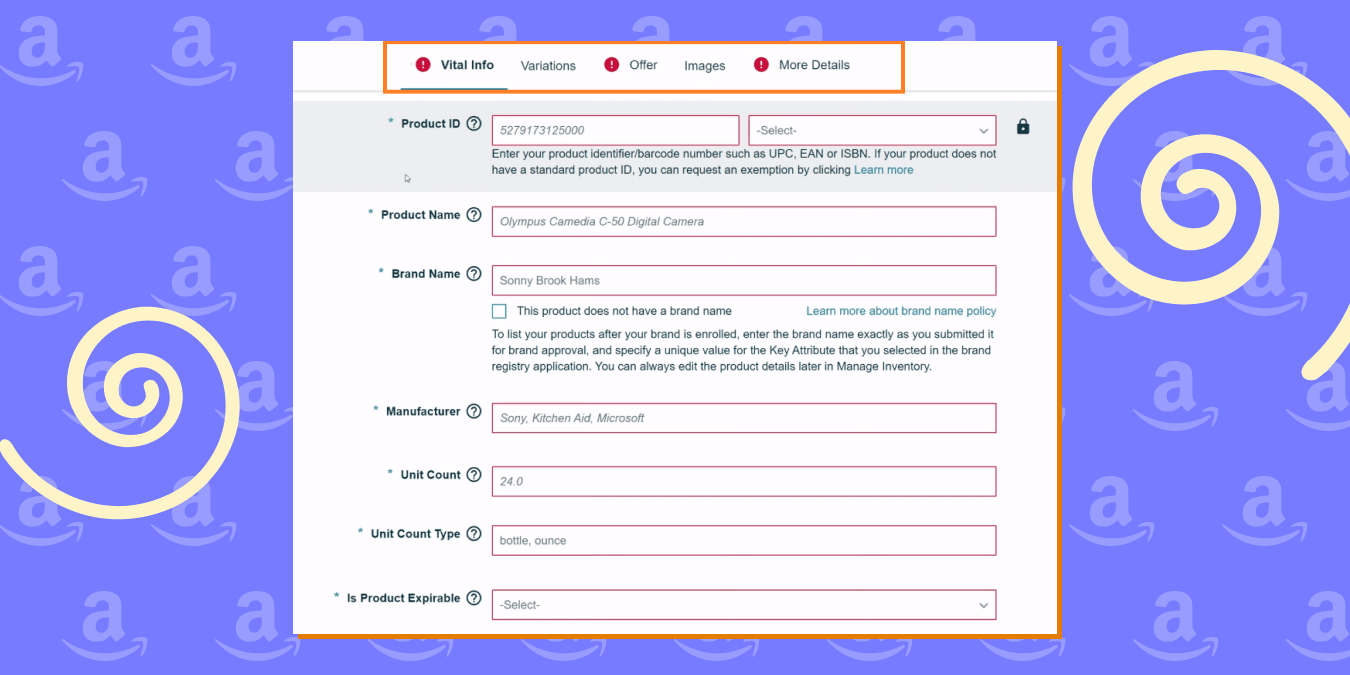
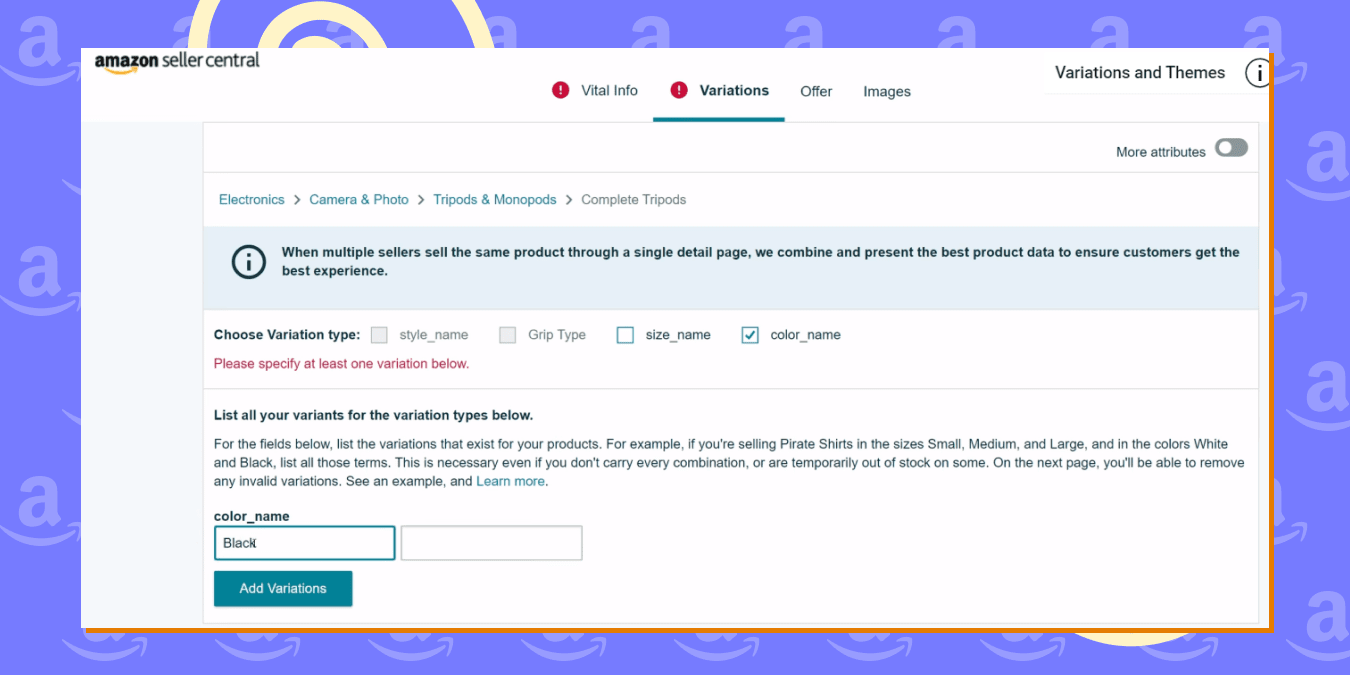
Step 4: After you’ve selected the category for your Amazon product listing. You will land on the next page. Here, you’ll notice that your listing information is divided into 5 tabs:
- Vital info
- Variations
- Offer
- Images
- More details
These tabs contain critical information regarding your product and are necessary for your Amazon product listings. You’ll have to fill out the details that are highlighted or have a red star next to them.
When you’re done adding all of these product details, click “Save and complete” to publish your listing on Amazon. After processing, Amazon ASIN number will be given to you for your new Amazon listing.
These are all the steps you need to know on how to list a product on Amazon. However, there are some complex details that we’ve to look at separately to get a better understanding.
So, let’s go over some of the key elements of creating an Amazon listing.
Amazon listing Vital info
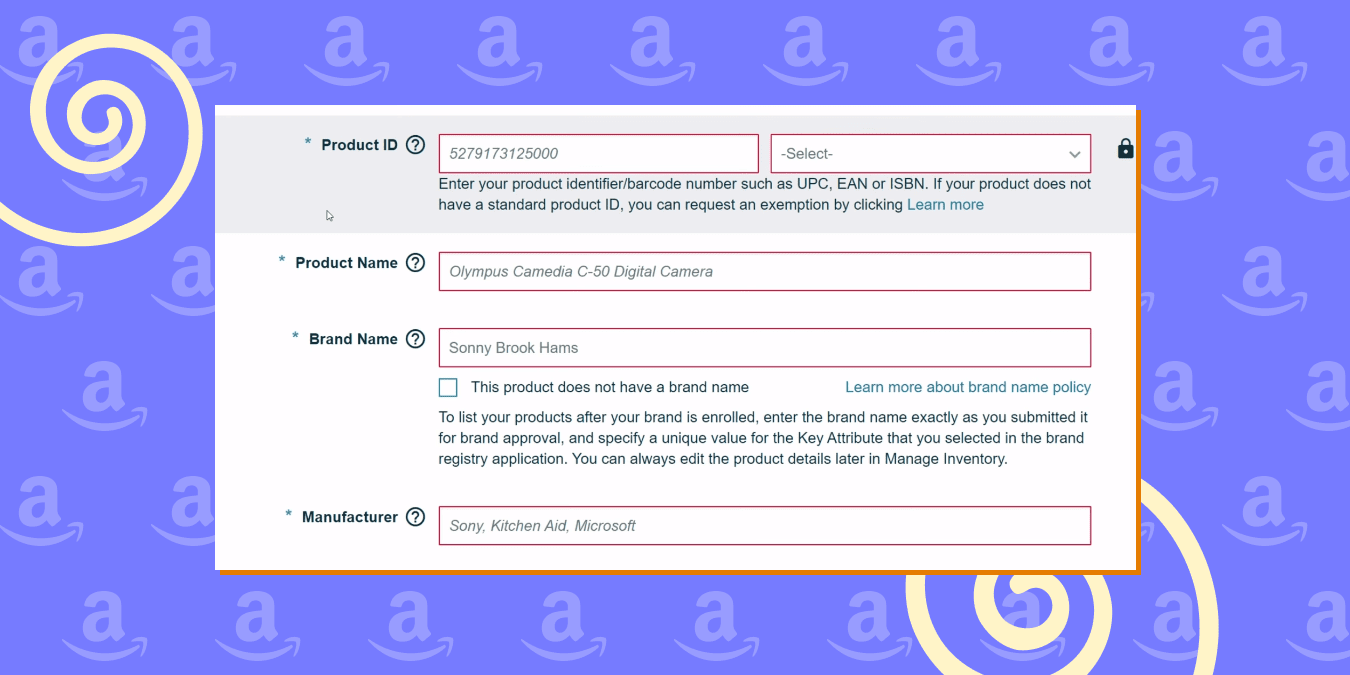
In the vital info tab you’ll have to enter the following key details for your Amazon listing:
- Product ID: In order to sell on Amazon, every item must be assigned a unique Product ID. Your product code (UPC, ISBN, etc) is your unique product identifier that distinguishes products on Amazon listings.
If you’ve made a private-label product and need a UPC number, you can get one from the manufacturer, or you may look it up online. UPC numbers may be purchased online from a number of sources. - Product Name: Your product name is the title of the item which customers will see on your Amazon listing. The key is to make sure that the product name is precise so that customers can easily find it.
- Brand Name: Enter a brand name for the item. If your brand isn’t registered, Amazon will ask you to provide them with some evidence. You can do so by sending them images of your product and packaging with your branding. In fact, registering your brand on Amazon can enhance your product listings and increase your conversion rate.
- Manufacturer: Here you have to enter the name of the manufacturing company. For example, Sony, Apple, etc.
These were the most important details in this tab of your Amazon listing. Let’s move on to the next tab now.
Amazon Variation listing
The variation tab is only relevant to you if you’re listing multiple variations of a product. For example, if you’re offering the product in different colors or sizes. In this section, you’ll add details for each variation separately. The variation themes will differ depending on the category of your product. Without making it complicated, you can create the variation for the following types:
- Color
- Size
- Style
- Model
You can overcome this complex process by simply integrating Sellbery to manage your product listings on Amazon. Seller is a third-party inventory management tool that can create an Amazon product listing for multiple versions of a product. Furthermore, you can automate your product listing task and optimize it to increase your conversion rate.
Amazon listings Offer tab
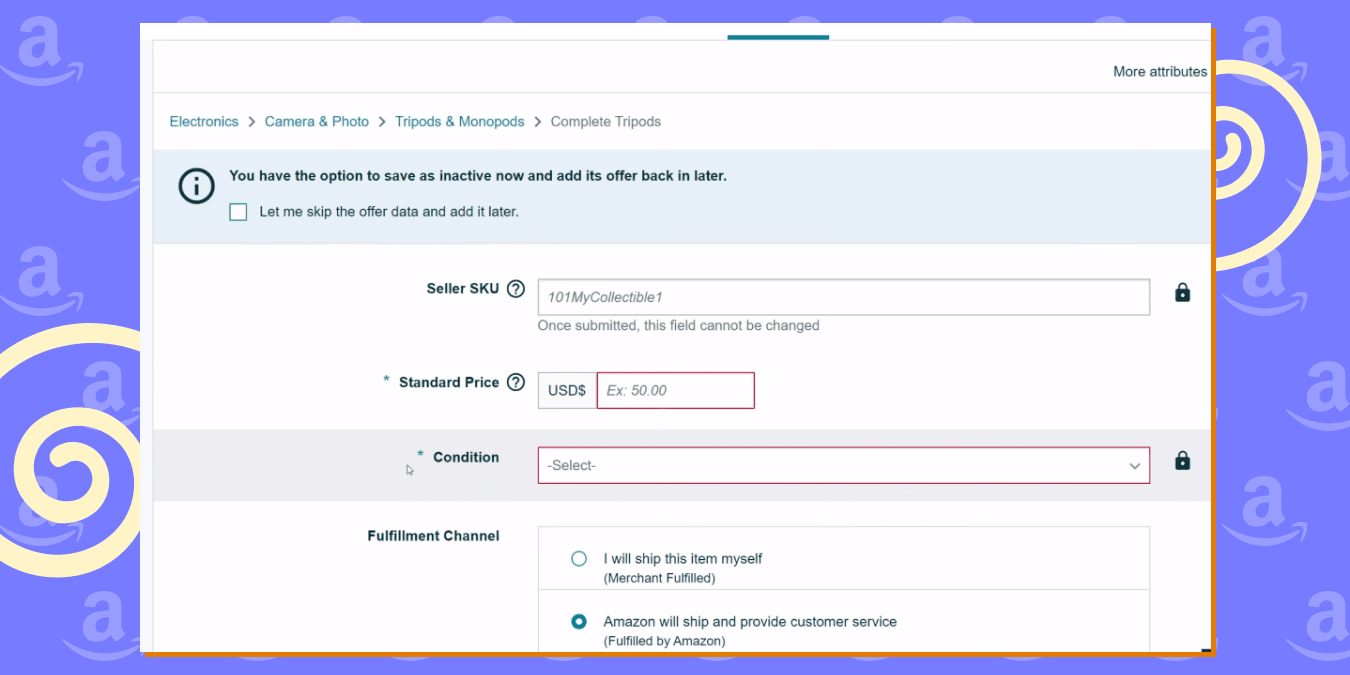
In the offer tab, you’ll have to provide the
- Seller SKU: You can create a unique product identifier. The seller SKU allows you to keep track of your inventory and is only relevant to you.
- Standard Price: This is the price you will start selling the product for. Generally, you should start by entering a higher price since lowering the price of a product after the listing is easier.
- Condition: Here you’ll select the condition of the product i.e New, Used, etc.
- Fulfillment Channel: Next you’ve to choose the order fulfillment method. This detail will determine if your product is listed as an Amazon FBA listing or otherwise. You’ve two options here:
- Merchant fulfillment: You will ship the product independently by yourself using a third-party shipping service.
- Amazon fulfillment: You will use Amazon to provide shipping and customer services. If you opt for this fulfillment channel, your product will be listed as an Amazon FBA listing. But you’ll have to work with Amazon to get it sorted.
Amazon listing Images
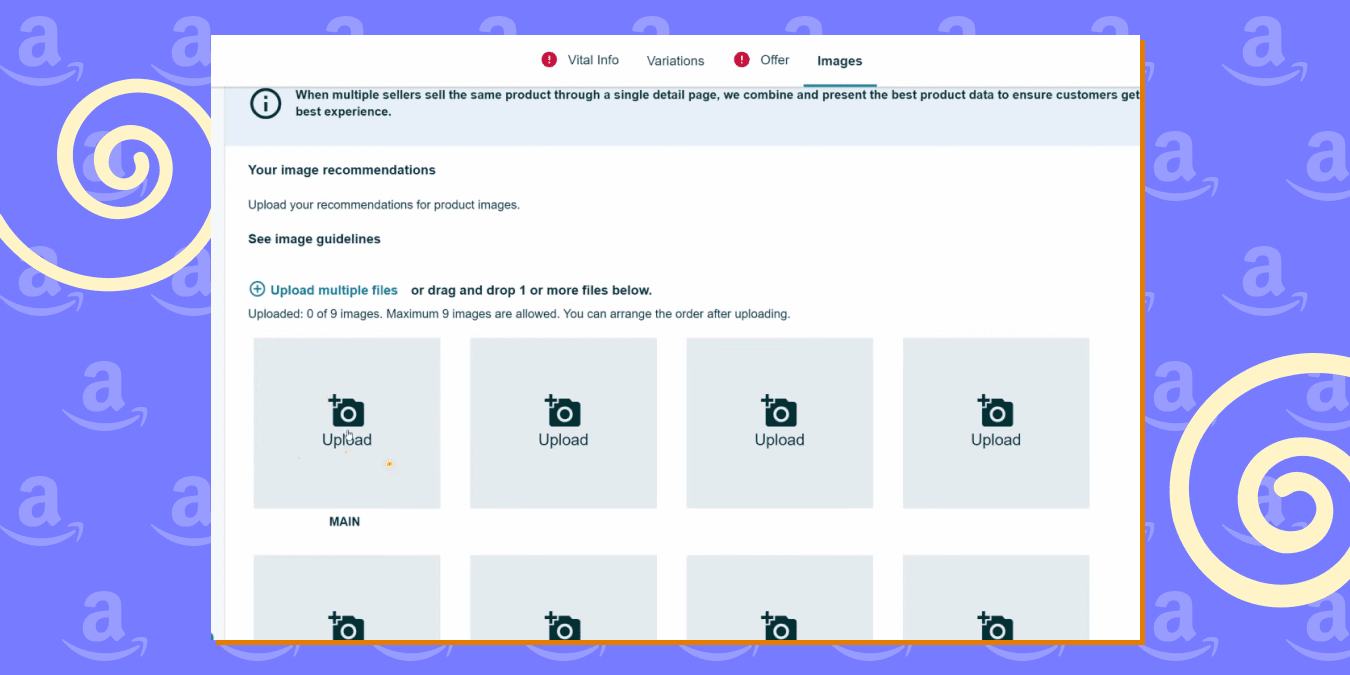
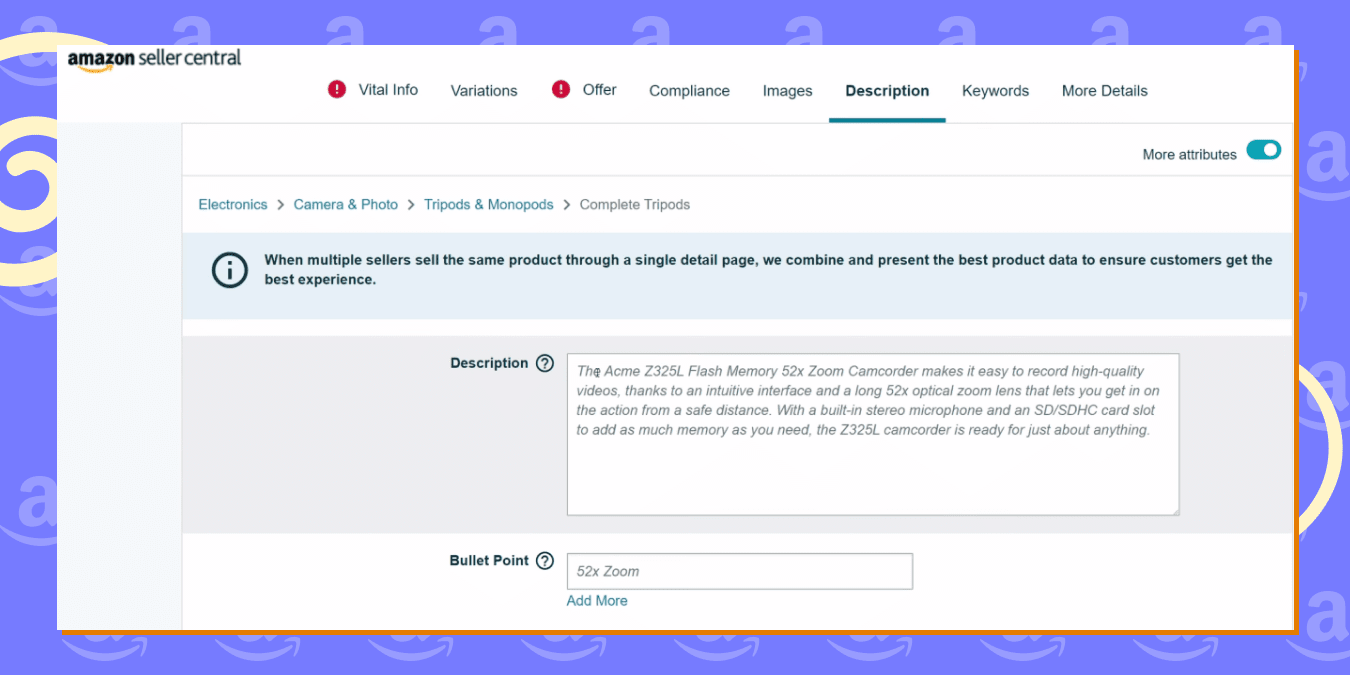
Images for your Amazon listing is extremely important. You can upload pictures of the product in the images tab. You’ve to upload at least one main image and can add up to 9 total. A general tip is to upload an image that covers 75% of the product and has a white background. There are other Amazon listing guidelines for images on the page to help you upload appropriate images.
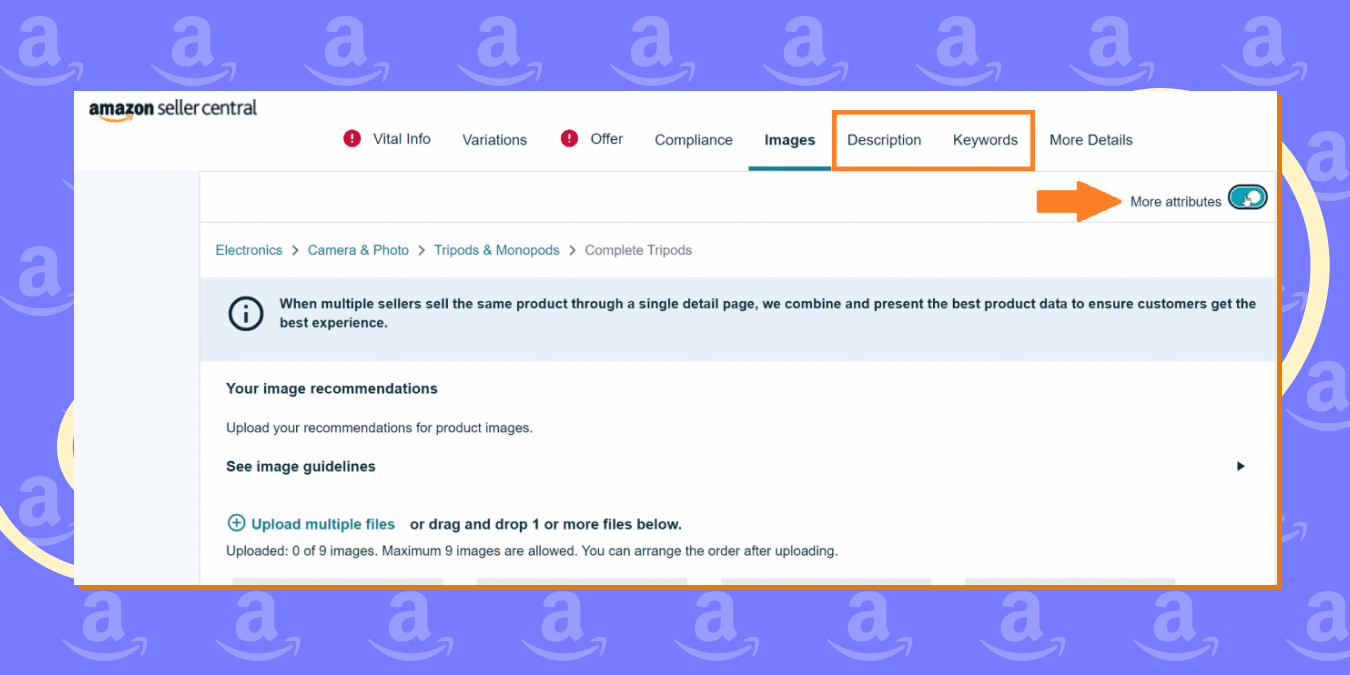
The next thing you need to do is click on “More attributes” on the top left side of the images tab. This will show you two more tabs for your Amazon listing.
- Description
- Keywords
Amazon Product Description
There are two key elements in the description tab of Amazon listings.
- Product Description: In the description field you’ve to write at least one sentence describing the product. The key is to include keywords in your description that customers might search for but add them in a concise manner. According to the Amazon listing policy, you have to provide an accurate description that helps buyers make informed decisions.
- Bullet points: Next you’ve to add bullet points for your Amazon product listings. These points are essential as they are displayed next to your product image. Generally, you should include key features of your product in bullet points. Including keywords in bullet points is an effective way of improving your product listing’s rank in search results. You can learn more about Amazon bullet points guidelines to create an Amazon listing that improves your conversion rate.
Keyword for listing on Amazon
The Keywords section of your Amazon product detail page is crucial for the success of your Amazon listing. Amazon will cross-check the keywords you enter in the search field when customers search for your product or related items. You should add as many keywords in the search field section. However, make sure that these keywords are relevant to your product and are not misleading. Furthermore, You can check our Amazon listing optimization guide to learn how to use keywords in the most optimal way.
These were all the key details of product listing on Amazon. Next, we will cover how to list products on Amazon in bulk.
How to list items on Amazon?
So far we’ve learned how to create an Amazon listing if you’re selling a brand-new product. But what if there is already a product listing on Amazon for the item? In case your business model is resale(wholesale or arbitrage) the chances are there is already an active Amazon product listing for that item.
Step 1: Navigate to the “Add products” page and search for the product in the Amazon product catalog using the Amazon ASIN number.
Step 2: Next, select the condition of your product.
Step 3: And the last step is creating your offer. Enter the starting selling price, choose the fulfillment method, etc and select “Save and complete” to submit your changes.
That is how you list items on Amazon with existing product listings.
Amazon product description guidelines
As we have explained earlier, the Amazon product listing page is meant to provide all the info to the customers so they can make a well-informed purchase. The details must help customers learn about the product and make them feel comfortable when buying your product.
Amazon product description guidelines outline the criteria you have to follow when you’re entering the product details such as your product names/titles, keywords, images, customer reviews, descriptions, etc.
So what are these Amazon product description guidelines? The following are the ones you need to know about to get started:
- The most basic but essential one is that your description must be accurate and precise. It should highlight the product features and explain the benefits that customers will get from it.
- They must be within the character limits (for example, 200 characters for most titles)
- The description must match the product images.
- Your product description must not contain any type of code such as HTML, JavaScript, etc.
- They must follow Amazon’s style guide, which is easier to implement when you use the appropriate template for your product category
- Most importantly, they must not invite customers to buy from you directly or elsewhere by including website links or other contact information. Doing so is against Amazon’s listing policy and you’ll most likely get banned from the platform.
- And you can’t include customer reviews, quotes, or testimonials in your product descriptions. Potential buyers can check your customer reviews when they land on your product listing page.
It is important that you read all the product listings and product description guidelines when adding a product on Amazon. This way you can avoid having your listing removed for violations later on.
Conclusion
Once you know what to do, adding products on Amazon becomes super easy. If you’re still struggling, you can simply opt for Sellbery and automate your product listing. Sellbery is suitable for all business models; some can benefit more than others. Furthermore, Automating your inventory management will save you time and help you focus on more important things such as choosing the right products to sell on Amazon.
Was this news helpful?



 Yes, great stuff!
 I’m not sure
 No, doesn’t relate


