


What is a Dieline? How to Make a Dieline for Packaging and Printing

What is a dieline? Understand its role in custom packaging and learn how to design dielines for printing and folding accuracy.
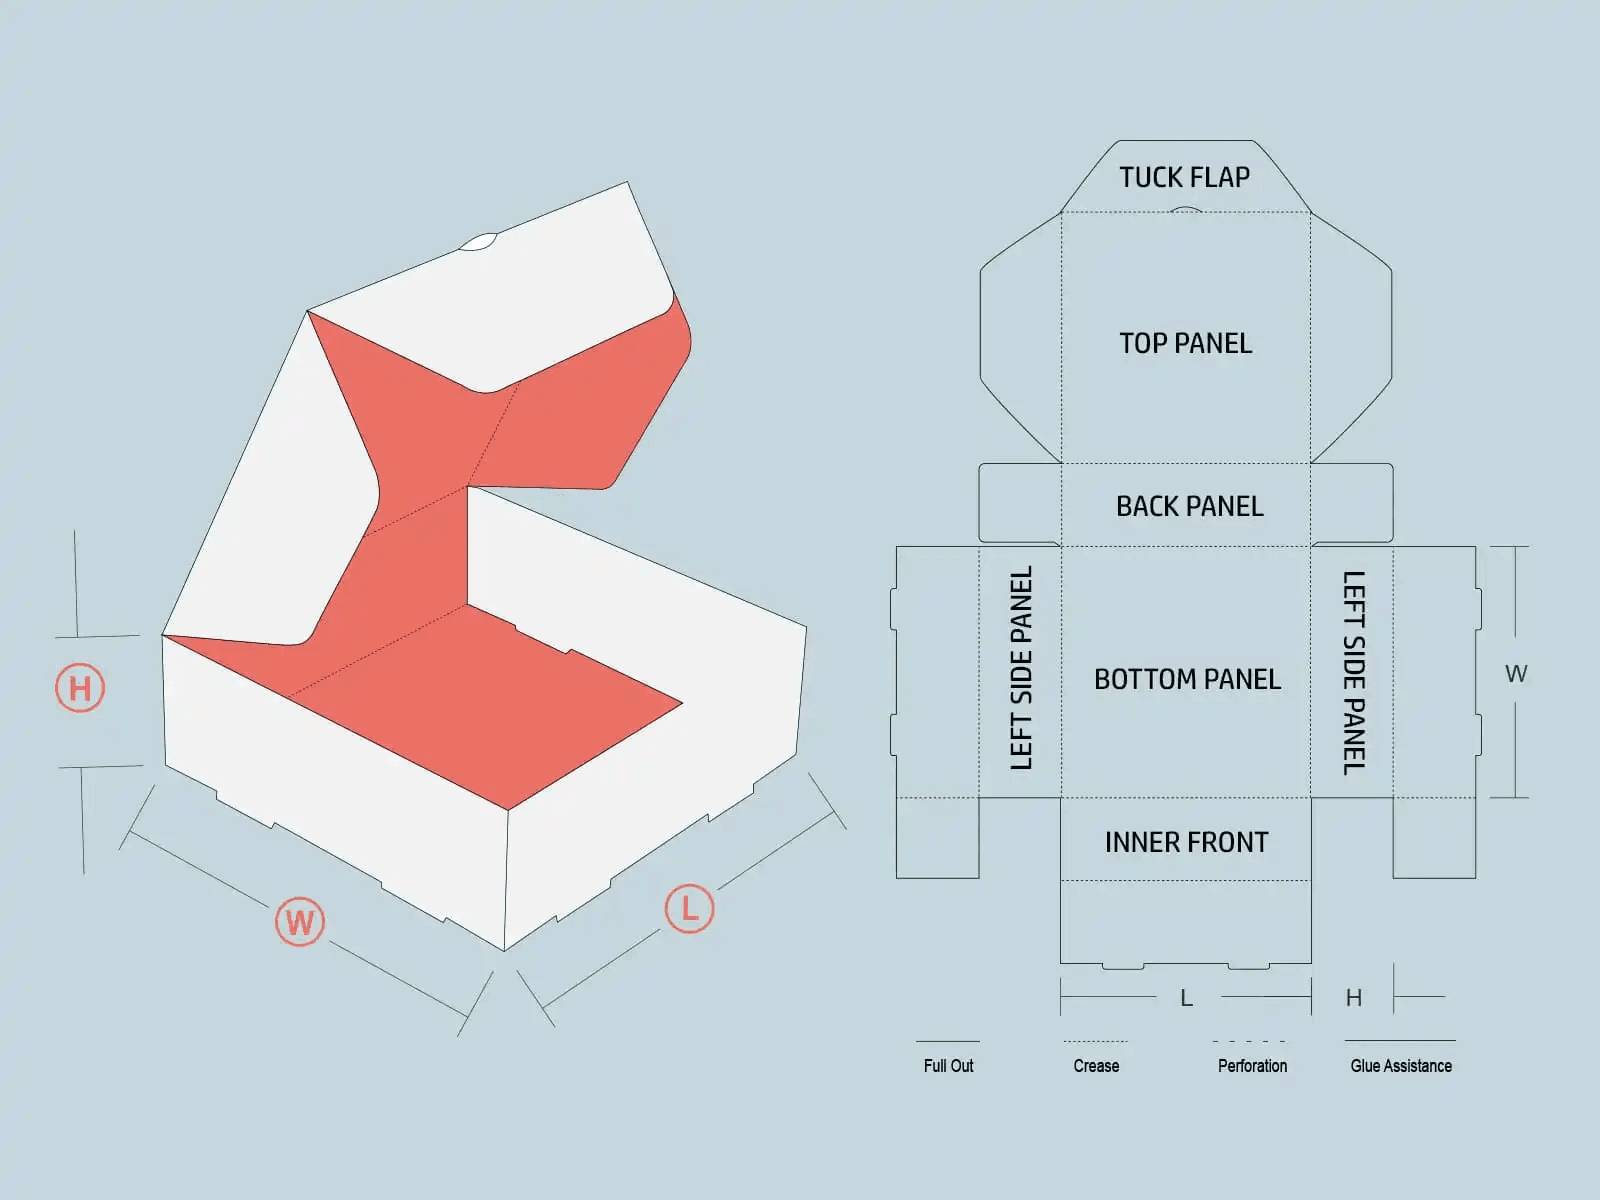
A dieline is a drawing of your packaging that shows the dimensions and where the box should be cut and folded. It shows where the box will be cut, folded, glued or perforated. It’s something of a map to help you see the orientation of your packaging design before it’s printed and constructed.
Dielines are a necessary part of package design, especially with custom product boxes or odd-shaped containers. They also help prevent designs from being printed with misaligned text or a portion of the logo missing.
For packaging, they use a vector design tool, which could be Adobe Illustrator. The dieline that is used should be a 100% accurate rendering of the product and contain specific descriptions indicating cut, fold, and bleed specifications.
The knowledge of what a dieline is can mean the difference between correct box production and professional printing results.
Why is a Dieline Important?
A dieline is your guarantee that your packaging ends up looking just as you had in mind. This accelerates the block-up process, it prevents mistakes in design placement and structure so that the printer and designer are always in sync.
Artwork can print without cutting areas, fold areas can land in the wrong areas, and the final product might not assemble. A dieline serves as a blueprint for production and design precision.
Components of a Dieline
When a person understands what a dieline is, the person has to know the fundamental elements of the dieline. These are the pieces that enable your printers to know how to cut and fold your packaging.
Cut Lines
These show where the packaging material will be physically die cut from the sheet. Cut lines need to be clear and are usually defined by a solid color such as magenta or red.
Fold Lines
These indicate where the packaging will fold. They are known as crease lines. They are usually represented by dashed lines to differentiate them from cut lines.
Bleed Area
The bleed is the little extra material around the dieline where art extends past the die line to print to the trim edge. It’s usually about 1/8″ (0.125″) all the way around.
Safety Zone
This sits inside the dieline, not the edges or folds. Include important text and logos inside this area to avoid having them trimmed off or wrapped around to the back.
Glue Tabs
These parts of the dieline are where glue is applied to create the box. No design elements should be obscuring these tabs.
Creating the Dieline
Designing a dieline necessitates precision and proper measurements. Here are the basic steps:
Measure Your Product
Measure the length, width and depth of the product you are packaging.
Design a Box Style
Select a configuration of tuck box, mailer box or custom die-cut shape.
Sketch the Layout
Trace the individual panels of the box (flat) separately on a single piece for the sheet (with flaps and glue tabs).
Use Vector Software
Once your artwork is done, generate your physical dieline in a program such as Adobe Illustrator, not relying on the digital dieline if one is provided, as this can lead to slight inaccuracies.
Apply Colors to Lines
Use different colors to identify cut, fold, and safe parts.
Creating a Custom-Shaped Dieline
If it is not just a regular box, you are going to need a custom dieline. Here’s how to make it:
Determine the Shape
Draw your custom shape on paper or in 3D software.
Use Software Tools
Draw the shape in a vectoring program. Define the perimeter, creases and cuts.
Test with a Mockup
Print and cut out a prototype to test the shape for functionality.
Adjust as Needed
Adjust layout to correct folding and positioning issues.
Add Bleeds and Safety Zones
Complete the dieline by adding technical areas for printing.
Tailoring a custom dieline produces special custom printed boxes no minimum<, perfect for startups or special editions.
What are the Types of Lines in Dieline?
Knowledge of the types of lines in your dielines is an absolute necessity for successful print and packaging.
Cut Lines
Cut lines are lines that indicate where the printer will cut the material. These lines define the size of the final box and are usually drawn in a color (magenta), for example.
Fold Lines
These lines are dashed and indicate where the fabric will be folded. Well-shaped cutting lines make the box come out in perfect shape without tearing or misalignment.
Perforation Lines
The perforation lines are simply dotted. They permit a portion of the box to be easily torn away, such as tear-open tabs.
Bleed Lines
Bleed lines extend to the outside edge of the package’s final dimensions. They make it possible for the background to run off into the bleeds after cropping.
Safety Lines
Safety lines are placed on the dieline to keep any text or graphics from getting cut off. Critical design elements should be kept within this space.
These lines all play a part in what a dieline is, for accuracy from design to press.
Using Adobe Illustrator to create a dieline
The folks at Adobe won’t tell you, but at every packaged goods company in the known universe, they use Adobe Illustrator to draw dielines. Follow these steps:
Set Up a New Document
Create a new file and make sure the dimensions are right (in inches or mm).
Use the Pen or Shape Tool
Design your box layout with shapes. And now draw the panels, flaps and glue tabs.
Label Your Lines
Make the cut, fold and bleed area in a different color and line style.
Add Bleed and Safety Margins
All artwork should extend past the cut line, and all important text should be inside of the safety zone.
Save as Vector File
Format and save your dieline. Save your dieline as an EPS or PDF for the printers.
Always make sure you check column types, spacing, and measurements before committing.
Why You Can’t Use Adobe Photoshop to Create Dielines?
Adobe Photoshop operates in raster and vector formats are not accurate enough for dielines. Dielines should be vector-based for the precision of the cut and fold.
Photoshop also won’t recognize technical line styles, such as cut and fold lines, the way Illustrator will. That is why packaging professionals advocate for dieline creation in Photoshop.
Conclusion
The dieline serves as the backbone of a good packaging design. It leads the user through from printing to cutting and assembling. Whether you are searching for custom boxes packaging or custom printed boxes with logo, no minimum, a clear understanding and knowledge about the die cut process saves you time and money, and leads your packaging to look and work as you have envisioned.
For those wanting to print packaging in the US, plenty of companies have placed their trust in big names in the industry. One such option for all of your packaging requirements is Plus Printers, a printing service that is known for its eye for knick-knacks and knacks about die-line-based printing!
FAQs
What are the rules for dieline?
Labels should be neat, all files should be in vector format, and bleed and safety zones should be included. Professional standard die-lines are essential to keep printing and cutting errors at a minimum. Crop and crease lines should be clear and well coloured.
What is a dieline used for?
Dieline is the package design of the product. Follow the dieline to do your artwork. It is there to be a guide for the design and construction of the box.
How to make your own dieline?
Utilize a design program such as Adobe Illustrator to draw cut, fold and bleed lines according to your box’s measurements. Begin by taking measurements of your product and creating a flat layout with all of the components needed.
What is a dieline template?
A dieline template is a premade design layout for typical packaging shapes. It frees the 4-line setup for artwork, thus preserving time for designers, and also guarantees accurate lines for positioning over the box on the common box styles.
What is the difference between a dieline and mockup?
A dieline is a set of plans; a mockup is the tangible thing. The dieline is the guide for manufacturers. The mock-up is how the packaging appears after construction.
Was this news helpful?
 Yes, great stuff!
 I’m not sure
 No, doesn’t relate